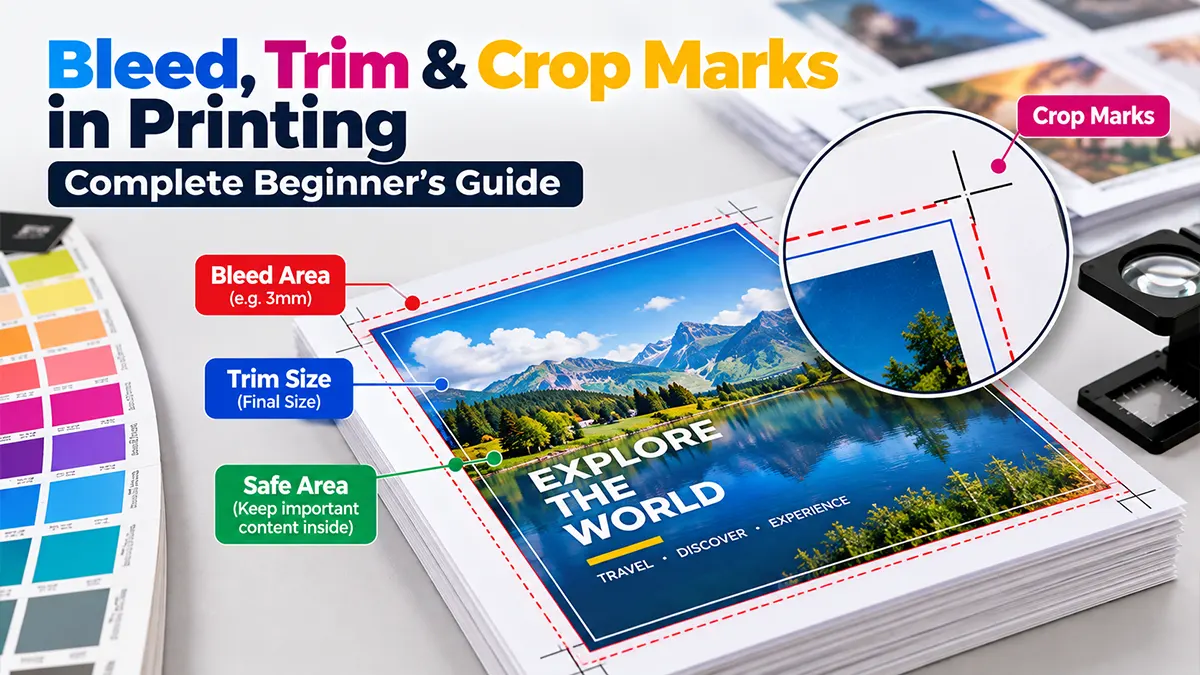
Quick Answer: What Are Bleed, Trim & Crop Marks?
Trim size is the final finished size of the printed piece after it is cut. Bleed is extra artwork that extends beyond that finished edge so small cutting variations do not leave a thin unprinted border. Crop marks, also called trim marks, are printer marks that indicate where the sheet should be trimmed.
Adobe describes trim marks as lines that define where the page should be trimmed and bleed as artwork extending beyond the printing boundary to allow for trimming tolerance.
Simple rule
Keep important text and logos inside the safe area, extend backgrounds and edge-to-edge images through the bleed, and use the crop/trim marks only as production guides.
Bleed vs Trim vs Crop Marks: The Difference
| Term | What It Means | Why It Matters |
|---|---|---|
| Trim Size | The final physical dimensions after cutting | Defines the finished product size |
| Bleed | Extra artwork extending beyond the trim edge | Helps prevent white slivers after trimming |
| Crop / Trim Marks | Lines showing where the sheet should be cut | Give the production team a cutting reference |
| Safe Area | Inner zone where important content stays away from the cut | Reduces the risk of text or logos being cut too close to the edge |
| Slug Area | Optional area outside the bleed for production information | Can hold printer instructions or job information when requested |
What Is Bleed in Printing?
Bleed is the portion of artwork that continues beyond the final trim boundary. It is used when a background colour, photograph, pattern or graphic must appear to run all the way to the edge of the finished piece.
Without bleed, even a small difference between the intended cut and the actual cut can expose the unprinted paper along an edge. Bleed provides extra image area that can be removed during finishing. Adobe explains that bleed acts as a margin of error so artwork can still reach the edge after trimming.
What Is Trim Size?
The trim size is the final size of the printed product after the printer cuts away the excess sheet. For example, if a business card is specified as 3.5 × 2 inches finished size, that is its trim size.
The artwork document may therefore be larger than the finished product because it includes the bleed area. In PDF production, Adobe also distinguishes the TrimBox from other page boundaries such as the BleedBox and CropBox.
What Are Crop Marks or Trim Marks?
Crop marks are small lines placed around the artwork to indicate the intended trim boundaries. Adobe uses the term trim marks for marks that define where the page should be trimmed.
They are especially relevant to commercial print production, where sheets can contain multiple copies or pages that must be accurately cut. They should not be confused with the artwork itself: the marks are production guides, not part of the finished design.
How Much Bleed Should You Use?
There is no single bleed value that applies to every print job. The correct amount depends on the printer, finishing method, document type and production workflow. Adobe's Illustrator documentation notes that bleed size depends on its purpose and advises checking with the print shop for the required value.
Common commercial setup
Many print workflows commonly use a small bleed around all sides, often 3 mm, but this should be treated as a workflow convention rather than a universal rule.
Large-format or special finishing
Large-format graphics, packaging, die-cut work and special finishing can require different settings. Confirm the production specification before exporting.
For example, Adobe's Illustrator guidance discusses 18 points as a minimum for a press bleed in one workflow while noting that other purposes can require much less. This illustrates why the printer's specification should take priority over a generic number.
Safe Area: Keep Important Content Away From the Cut
Bleed protects the outer edge; a safe area protects the important content inside it. Keep headlines, phone numbers, logos, QR codes, faces and other critical elements comfortably inside the trim boundary.
The exact safe margin depends on the product and finishing process. A print provider may specify a minimum distance from the trim line, especially for business cards, booklets, packaging and die-cut products.
Bleed Example: 3.5 × 2 Inch Business Card
Suppose the finished business card is 3.5 × 2 inches. If the printer requests 0.125 inch bleed on each side, the artwork area becomes 3.75 × 2.25 inches before trimming.
| Area | Width | Height |
|---|---|---|
| Finished trim size | 3.50 in | 2.00 in |
| Bleed on each side | 0.125 in | 0.125 in |
| Artwork size including bleed | 3.75 in | 2.25 in |
This is an illustrative calculation, not a universal business-card specification. Always use the dimensions supplied by your printer.
What Happens If You Do Not Add Bleed?
If the design ends exactly at the trim line, slight cutting variation can expose a narrow white strip along an edge. This is most noticeable when a solid background or photograph is intended to continue to the edge.
A file without bleed may still be printable when the design has intentional white margins, but edge-to-edge designs generally need the artwork extended beyond the final trim boundary.
Crop Marks Are Not the Same as Bleed
These terms are often mixed up, but they serve different purposes:
- Bleed is extra artwork outside the final finished size.
- Trim size is the final physical size.
- Crop/trim marks show the intended cutting position.
- Safe area is the protected interior zone for important content.
Adobe's print-production tools treat trim, bleed and crop boundaries as distinct page boxes or production references.
Do You Always Need Crop Marks?
No. Whether crop marks should be included depends on the print workflow and the file specification. Adobe's current InDesign guidance specifically says printer marks are intended for commercial printing workflows and can be skipped for digital or office printing.
Some commercial printers prefer to add their own marks during imposition, while others want them included in the supplied PDF. Ask before exporting rather than automatically selecting every printer-mark option.
Other Printer Marks You May See
| Mark | Purpose |
|---|---|
| Trim Marks | Indicate the intended cutting boundary |
| Bleed Marks | Can indicate the bleed boundary in supported workflows |
| Registration Marks | Help align colour separations |
| Color Bars | Provide colour/ink-density control information for production |
| Page Information | Can identify production details such as file or page information |
Adobe lists trim marks, registration marks, color bars and page information among common printer marks.
How to Set Bleed in Adobe Illustrator
- Create the document at the intended finished trim size.
- Open the document or artboard setup and enter the bleed requested by your printer.
- Extend background artwork, photos and edge-to-edge graphics through the bleed.
- Keep important text and logos inside the safe area.
- When exporting the PDF, use the Marks and Bleeds settings required by the print provider.
Adobe's Illustrator documentation provides dedicated Marks and Bleed controls for setting bleed and printer marks.
How to Set Bleed in Adobe InDesign
- Set the document to the final finished page size.
- Define the document bleed according to the printer's specification.
- Extend full-bleed elements beyond the page edge into the bleed area.
- Keep critical content away from the trim line.
- During PDF output, open Marks and Bleed and enable only the marks requested by the printer.
Adobe's current InDesign documentation explains how to configure crop marks, bleed marks, registration marks, color bars and page information.
Bleed and Crop Marks in Print-Ready PDFs
A professional print PDF can contain separate page boundaries for media, crop, trim and bleed. Adobe Acrobat's print-production tools allow these boxes to be inspected and adjusted in supported workflows.
When exporting, do not assume that adding every possible mark makes a PDF more professional. The correct file is the one that follows the print provider's specification, including bleed, colour profile, page size, scale and requested printer marks.
Common Bleed & Crop-Mark Mistakes
1. Designing Only to Trim Size
A full-bleed background that stops at the trim line can expose white edges after cutting.
2. Putting Text in the Bleed
Important content should not be placed where trimming can remove it.
3. Using the Wrong Bleed Value
A generic bleed value may not match a particular printer, die cut or finishing process.
4. Adding Marks Without Checking
Some printers add marks during production and may not want them embedded in the supplied artwork.
Print-Ready Bleed & Crop-Mark Checklist
- Confirm the final trim size.
- Confirm the required bleed value with the printer.
- Extend all edge-to-edge artwork into the bleed.
- Keep logos, text, QR codes and other important elements inside the safe area.
- Confirm whether the printer wants crop/trim marks included.
- Check colour mode/profile and PDF standard requested by the printer.
- Check image resolution and effective PPI for placed raster images.
- Review the final PDF at 100% and inspect trim and bleed boundaries.
- Do not rely on a generic online template if the printer has supplied its own specification.
When Should You Ask the Printer Before Exporting?
Ask for specifications whenever the job involves commercial printing, unusual finishing, die cutting, packaging, large-format production, booklet imposition or a new print vendor. Request the finished size, bleed, colour profile, PDF standard, image-resolution expectations and printer-mark requirements in writing.
This small check can prevent an otherwise finished design from being rejected or requiring re-export.
Conclusion
Bleed, trim and crop marks solve different production problems. Trim defines the final size, bleed provides extra artwork beyond that size, and crop marks indicate where cutting should occur. Keeping important content inside a safe area completes the basic setup.
The exact production settings should always follow the print provider's workflow. Adobe's current documentation also recommends configuring printer marks and bleed according to the intended print process rather than treating one setting as universal.
Frequently Asked Questions
Sources & Further Reading
Disclaimer
Printing specifications vary by printer, substrate, finishing method and production workflow. The examples in this guide are educational and should not replace the technical specification supplied by your print provider.
Need Help Preparing a Print-Ready File?
If you need help checking bleed, trim size, crop marks, artwork dimensions or print-ready PDF preparation, discuss your project with GN Branding Agency.
Discuss Your Print File